Thursday, May 31, 2012

2012 Free Motion Quilt Challenge - May


This month's tutorial comes from Leah Day of The Free Motion Quilting Project. Leah has an amazing amount of information on her website. All of her free motion quilt designs have video tutorials and she has a wonderful program, the Free Motion Quilt Along with weekly lessons to help you improve your free motion skills.

For the Free-Motion Quilting Challenge this month, Leah chose two foundational designs for us to practice. The first one is called Double Stippling. To make this design you stitch over your design area using a very large scale stipple. Then you stitch over your design with a smaller scale stipple making sure to fill all the spaces. 


The second design is called Railroad Tracks. Like the first design you start by stitching a large scale stipple. Instead of wiggling back and forth over your wavy line, you use just straight lines and sharp angles creating what looks like railroad tracks. This was a much more difficult design to stitch. Not all my lines are straight and not all my angles are sharp. It took a lot more effort to think ahead so that the spacing would be consistent and all the areas would be filled in. But with each practice it got better. I think this design would be so cute on a little boy's quilt. 


I can't wait to see what next month's tutorial will be!

Monday, April 30, 2012

2012 Free Motion Quiltig Challenge - April


I'm really learning a lot from this challenge. This month's tutorial was by Don Linn. Don gave a video tutorial demonstrating how to transfer and mark designs. The first step was to choose a design. I chose to use the design that Don provided with the tutorial although any design could have been used. This looks like a simple design but there's a lot of backtracking in it. Another thing I need to practice.


 The next step is to stretch a piece of tulle in an embroidery hoop and trace the design onto the tulle using a permanent marker.


Here it is with just a blank sheet of paper underneath to make the design more visible. 


Then,  place the embroidery hoop with the marked tulle over your fabric and trace your design onto the fabric using your favorite marking pencil. I used a water soluble marker.


And, here is my sample after quilting and washing out the marker. 


I'm getting this done and submitted at the last minute, so I just did the basic design. I wanted to add some outline quilting and some background fill around it, but I'm barely getting this done in time so I didn't. 

I think this is a great technique, especially if you're wanting to mark a design multiple times on the same quilt. 

Friday, April 27, 2012

SBS - Clay's Choice

Another simple block for this week. This is Clay's Choice.

Friday, April 20, 2012

SBS - Yankee Puzzle

The last couple of blocks have been a little on the challenging side so I did a simpler block this week. It went together in a snap.

Tuesday, April 17, 2012

Fiesta de Talavera - Block 2


I've finished block 2! This is such a fun project to hand applique. There are a lot of pieces in each block (this one has 125) and they take a little time, but the majority of them have easy, gentle curves making them perfect for time in front of the TV. I really like working with these bright colors against the dark background. It's so much fun to see the block coming together as I'm working on it.

Friday, April 13, 2012

SBS - New Mexico

The block I chose this week is called New Mexico. The more I work with little pieces, the more I realize I need more practice working with little pieces. The rail fence blocks were actually paper-pieced in long strips and then sub-cut. The same with the nine patch blocks. That helped quite a bit since this is basically a 25-patch block done in 6 inches. That makes for some tricky measurements.


I've mentioned before my journey with Sylvia's Bridal Sampler.  I'm glad to be back on track and am looking forward to having it done. This week's block is number 100! Only 40 more blocks to go! Some time ago I made a graph and have been inserting pictures of the blocks as I do them. Mostly I use this to keep track of the fabrics I'm using so that I don't use the same fabrics in blocks that are next to each other. But I also like seeing how the spaces are filling up. As I insert the pictures some of the blocks get cropped. I don't know why. But, you can get an idea of how this quilt is shaping up.

Sunday, April 8, 2012

SBS - Laurel Wreath


This block was a little challenging. I don't usually draw seam lines when I piece, but I did on this one because of all the Y seams. I think it made a world of difference in getting everything to line up just so.

Sunday, April 1, 2012

March UFO

Back in 2007, my LQS in Albuquerque did this quilt as a Saturday Sampler. The name of the quilt is Ramblin' Rose Meets Jamestown. The quilt was designed by Marti Michell using her template sets. While it takes a bit more time to cut the pieces using the templates, I think you make up for it with how easy the pieces go together. Some of these blocks would have been very challenging with regular piecing, but with the templates they went right together. I have a couple of other quilts I'd like to make using the templates - someday. The sampler blocks were named to celebrate the 400th anniversary of the founding of the Jamestown settlement - New Colony, Roanoke Island, John Smith, and Stormy Voyage, to name a few. I had no idea when I started this quilt that I'd one day be living in Virginia.

I got all my blocks made and even had all 24 of the log cabin blocks done by the end of that year. In early 2008, I assembled the blocks and that was as far as I got. For the UFO Challenge, my goal was just to get the borders on. I've also made the binding and have fabric set aside for the backing, but that's all I'll be able to do for a while. This is a king size quilt measuring 104" square. I have an older machine with a very small throat and there is just no way that I can fit a king size quilt in there to get it quilted. I hope to get a new machine in the next year or two. The quilt has been waiting this long, it can wait a little longer.

Saturday, March 31, 2012

2012 Free Motion Quilting Challenge - March


This month's tutorial was given by quilt artist, Ann Fahl. Ann's tutorial was packed with information, but what stuck out to me the most was her advice to add motifs to meandering and stippling designs to make them more interesting. And, one of her tips is to start a quilting design notebook and practice doodling in it. To get us started, she shared a few designs with loops, hearts, stars, spirals and flowers.

I don't think I practiced drawing this month as much as last month's feathers. I've had a couple of other projects that I've been working on and getting the challenge done kept taking a back seat.

I practiced drawing all of the above designs, but chose to quilt the flowers and spirals. I like these meandering flowers. I think they'd be cute on a little girl's quilt or a spring quilt. Looking at the picture I can see where I need to vary the direction just a little bit.


I had done some spirals on a quilt not too long ago, but they were large spirals with a little space between them. I decided I'd try working on smaller, more tightly-packed spirals. Getting the spacing was pretty tricky.


I know I need to spend more time practicing. This challenge is giving me a lot more quilting confidence. Maybe that stack of tops will get quilted sooner than I think.

Friday, March 30, 2012

SBS - Glorified Nine Patch

The block I chose to do this week is Glorified Nine Patch. I really love this block. I hope to do a whole quilt in this block one day. If I do, the blocks will be larger than 6" though. There were two different methods for assembling this block. One was to use templates and do curved piecing. The other was to assemble an uneven nine patch and applique the long curved pieces. Can you guess which method I chose? I really like how it came out. If I were to do a whole quilt I think I'd go with the templates though.

Saturday, March 24, 2012

Cherry Blossoms 2012


 I think it's time for a "Places" post, don't you? I know it's been a while. This morning Rich and I got up very early to go see the cherry blossoms around the Tidal Basin. I mean VERY EARLY. We were up and on the road before sunrise. We figured the earlier we went, the fewer people there'd be out and about. It takes less than 10 minutes to drive there, but parking anywhere near that area is difficult when the cherry blossoms are in bloom. Normally we'd have taken the Metro, but the nearest station to the Tidal Basin is about a mile away and we knew it was likely to rain. I didn't take too many pictures because it was misty and drizzly the whole time, but we had a really enjoyable time. The early morning mist gave an almost magical quality to an area that is usually teeming with tourists and not at all magical.


It was several days past the "peak bloom" time but there was still a spectacular show going on:


Everywhere I looked there was "pink snow" to be seen:


And I just loved how those little pink blossoms were stuck to everything:


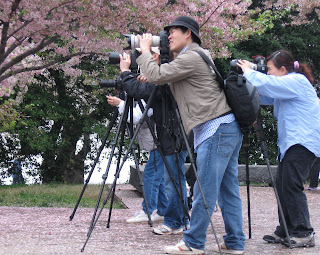
As the morning went on more and more tourists were about and it was kind of fun watching the people who really know how to use their cameras (I'm not one of them) set up for those perfect shots:


I think I'm going to call this one Cherry Blossom Paparazzi:


Whenever I'm around the Tidal Basin I like to walk by the Floral Library which is maintained by the National Park Service. It changes quite a bit throughout the year. Right now, there are nearly 100 different varieties of tulips in bloom:


I especially loved these ones:


And these ones:


We were back home in time for breakfast and just before the rain.

Friday, March 23, 2012

SBS - Sylvia's Shooting Star

I thought this block was going to be simple. It looks pretty straightforward, right? The star's rays are paper-pieced and went together easily enough. The corner where the rays all come together is a little bulky with all those pieces coming together there. But the star? It finishes at just 3 inches! I think I need more practice working with very small pieces. I felt like I was all thumbs! 

Friday, March 16, 2012

SBS - Trip Around the World


This block was paper-pieced in rows and then the rows sewn together. It went together in a snap!

Saturday, March 10, 2012

SBS - Love in a Mist

Well, this block was a little frustrating to put together. I won't even go into all the little problems that arose, or the steps that I had to do over. One thing I know for sure - as my frustration level increases, my perfectionism decreases. "Done is better than perfect." Right? I haven't pieced very many eight-point star blocks. I really do love them though. I would love to do a whole quilt with eight-point star variations. They will not be six-inch blocks though, I can tell you that. This block was a little wonky when I finished piecing it. It's amazing what a little steam can do.

Monday, March 5, 2012

Fiesta de Talavera - Block 1


This is Fiesta de Talavera, an applique quilt pattern by J. Michelle Watts. I fell in love with it the second I saw it. It's being offered as a Block of the Month class at Southwest Decoratives in Albuquerque, NM and my friend Liz is teaching it. My friend Olive is taking the class. I wanted to take it too, but it's kind of a long commute from Virginia. So, I decided that I'd follow along as best I can. In class, Liz will be exploring different methods of applique, but I'm just going to stick with my favorite method - back basting. I like to get stitching as quick as possible and don't really like making templates or overlays. Yeah, I'm lazy. Here's my first block:


Sunday, March 4, 2012

SBS BOW - Fool's Puzzle

The block I chose to do this week, Fool's Puzzle, is a Drunkard's Path variation. I generally don't mind sewing curves, when they're large, gentle curves. But, these units finish at 1-1/2 inches and I didn't relish doing 16 of them. So, I decided that I'd try a technique I once saw in a book. I appliqued circles to squares, and cut them into quarters. 


This isn't the final arrangement. I forgot to take that picture, but it looks great, right? Well, look what happened when those units were sewn together.


Not so great. This technique might work for larger circles and squares, but at this size it's very noticeable that the arcs are kind of flat and the circle shape is lost. So I thought. And thought. And thought some more and just before falling asleep a couple of nights ago it came to me. Remarkably I still remembered my "bright idea" the next morning AND it seemed to make sense. I made a template and appliqued the shapes to the squares and cut them into quarters. 


They look a little wonky, don't they? But, here's what they look like sewn together:


I'd say this is a definite improvement. 

(Sorry about the different lighting in the pictures. The completed blocks were scanned whereas the intermediary steps were done with the camera.)

Thursday, March 1, 2012

February UFO Finish

For February, Judy drew #1 and on my list that was an Applique Sampler wallhanging. This was made in a class over 4 months that I took back in 2006 (or was it 2007?) learning hand applique from Piece O' Cake's book, The New Applique Sampler. I loved making this wallhanging, but it was never finished when I didn't know how I'd quilt it. The top was done and I had the batting, backing and even the binding ready to go. I am excited to say that it's now done!

Wednesday, February 29, 2012

2012 Free Motion Quilting Challenge - February

For the February FMQ Challenge, Diane Gaudynski gave a wonderfully long and detailed tutorial on free-motion feather plumes. I love quilted feathers, but they can be a bit challenging. The only feathers I've attempted so far have been from a marked design. Free-motion feathers? Yikes! How could we be given something so challenging in just the second month?

Well, it was a really good tutorial and I practiced drawing feathers on a white board for quite some time. At first, they didn't even resemble feathers, but a few minutes here and half an hour there and by the end of the month my drawn feathers didn't look half bad. But drawing on a white board and doing them on the machine are different. I couldn't put it off any longer. Here are my first attempts:

free-motion feathered plume

 Oh boy, was I surprised! I never would have dreamed that I could quilt a free-motion feather plume. Okay, they're not perfect and I definitely need more practice. But you know? I am really happy with my first attempts. I would not have tried this if it hadn't been for the FMQ Challenge. Thanks SewCalGal!

Friday, February 24, 2012

SBS BOW - Handy Andy

This is another block that is paper-pieced. I'm still getting the hang of paper piecing. I have no problem PPing the individual units, but when it comes time to assemble those units it can be a bit of a challenge for me. One thing I really like about working on Sylvia's Bridal Sampler are all the different techniques I get to try out. By the time I finish all the blocks I won't be a master quilter like Sylvia, but I'll have certainly learned a lot.

Friday, February 17, 2012

SBS BOW - Cats and Mice

This is a block that I will most likely do over. I'll live with it up on the design wall and see how I feel in a couple of weeks, but there are just too many things wrong with it. I don't care when my points aren't perfect, but that QST in the lower right is just too far off. And, see the pink triangles? They form a star which is completely lost because the fabric is too close in value to the tan print. I like to call blocks like these my "learning blocks."

Friday, February 10, 2012

SBS - King David's Crown

Because these block are only 6 inches square, sometimes my fabric choices aren't the best. I love that green paisley fabric but it's probably too large a print to go in this block. And, the motif in the dark blue fabric didn't come out in any of the triangles. I thought about redoing the block, but decided that being a sampler and being scrappy, it was okay to leave it as is. Plus, I'm feeling a little lazy.

Friday, February 3, 2012

SBS BOW - Courthouse Steps

I was quilting all last week and most of this week so I thought I'd pick a simple paper-pieced block. I got all my supplies out and realized that it has been so long since I've paper-pieced that I forgot how to start! After a quick refresher I had this done in no time:

Wednesday, February 1, 2012

My January UFO finish

At the beginning of January I decided I'd follow along with Judy Laquidara's 2012 UFO Challenge. The way this challenge works is you make a list of 12 UFOs that you'd like to complete in 2012. Each month Judy will pick a number and that is the project that you will finish. Because I know that I will not have time to completely finish 12 UFOs, some of the items on my list are just to assemble the blocks into a top, or just to add the borders. I will finish some things and make progress on others. Maybe those "others" will end up being finishes, or maybe they'll be on next year's UFO list. Either way, I'll have made progress.  I'll add my UFO list to my sidebar once I figure out how.

For January, Judy chose the number 5. This was a from a Saturday Sampler program at a local quilt shop in Albuquerque from 2008. We moved to Arlington (the first time) that summer. I have to say that as the year progressed I wasn't liking this quilt so much, but I hung in there and was able to complete the blocks and assemble the top after we moved back to Albuquerque in the summer of 2009.

I needed to get backing fabric and figure out how I wanted to quilt it. That's the hardest part for me - the quilting. Because I didn't want to mark the quilt and because I'm wanting to practice free motion designs I decided to quilt it in swirls. I like how it came out. The swirls added a nice texture and having used black thread, my not-so-swirly swirls don't look too bad. Here it is quilted and bound:

Tuesday, January 31, 2012

2012 Free-Motion Quilt Challenge - January

I like to say that I'm a quilter. But really, I make a lot of quilt tops. And then they sit. Sometimes for a very long time. Getting those quilt tops actually quilted is a real challenge for me. So, when I saw that SewCalGal was going to host the 2012 Free-Motion Quilting Challenge, I knew I had to follow along.


The way it works is that SewCalGal has lined up some FMQ experts. Each month one of them will present a tutorial with tips for the participants to practice. Participants who pledge to complete the challenge can submit a picture and be eligible for that month's prizes. I wasn't going to take the pledge, just follow along on my own. But there are prizes! How fun is that? 


January FMQ leaves


The tutorial for January was by Frances Moore. She showed how to do some free motion leaves. After practicing on a white board for two weeks I bit the bullet and tried them out on a practice quilt sandwich. You know what? They don't look half bad! Are they perfect? No. I know I still need to practice my spacing and my stitch length consistency, but if this had been done on a printed fabric with matching thread it would have looked just fine. Most of all, this has given me a much needed boost in my confidence level. 


I'm looking forward to more tutorials, more practice and most importantly, finishing some quilts!

(I know I still need to do some work on the look of my blog, but I wanted to get this submitted before the deadline.)