Saturday, March 31, 2012

2012 Free Motion Quilting Challenge - March


This month's tutorial was given by quilt artist, Ann Fahl. Ann's tutorial was packed with information, but what stuck out to me the most was her advice to add motifs to meandering and stippling designs to make them more interesting. And, one of her tips is to start a quilting design notebook and practice doodling in it. To get us started, she shared a few designs with loops, hearts, stars, spirals and flowers.

I don't think I practiced drawing this month as much as last month's feathers. I've had a couple of other projects that I've been working on and getting the challenge done kept taking a back seat.

I practiced drawing all of the above designs, but chose to quilt the flowers and spirals. I like these meandering flowers. I think they'd be cute on a little girl's quilt or a spring quilt. Looking at the picture I can see where I need to vary the direction just a little bit.


I had done some spirals on a quilt not too long ago, but they were large spirals with a little space between them. I decided I'd try working on smaller, more tightly-packed spirals. Getting the spacing was pretty tricky.


I know I need to spend more time practicing. This challenge is giving me a lot more quilting confidence. Maybe that stack of tops will get quilted sooner than I think.

Friday, March 30, 2012

SBS - Glorified Nine Patch

The block I chose to do this week is Glorified Nine Patch. I really love this block. I hope to do a whole quilt in this block one day. If I do, the blocks will be larger than 6" though. There were two different methods for assembling this block. One was to use templates and do curved piecing. The other was to assemble an uneven nine patch and applique the long curved pieces. Can you guess which method I chose? I really like how it came out. If I were to do a whole quilt I think I'd go with the templates though.

Saturday, March 24, 2012

Cherry Blossoms 2012


 I think it's time for a "Places" post, don't you? I know it's been a while. This morning Rich and I got up very early to go see the cherry blossoms around the Tidal Basin. I mean VERY EARLY. We were up and on the road before sunrise. We figured the earlier we went, the fewer people there'd be out and about. It takes less than 10 minutes to drive there, but parking anywhere near that area is difficult when the cherry blossoms are in bloom. Normally we'd have taken the Metro, but the nearest station to the Tidal Basin is about a mile away and we knew it was likely to rain. I didn't take too many pictures because it was misty and drizzly the whole time, but we had a really enjoyable time. The early morning mist gave an almost magical quality to an area that is usually teeming with tourists and not at all magical.


It was several days past the "peak bloom" time but there was still a spectacular show going on:


Everywhere I looked there was "pink snow" to be seen:


And I just loved how those little pink blossoms were stuck to everything:


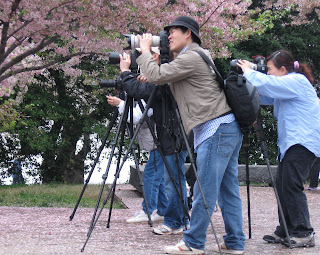
As the morning went on more and more tourists were about and it was kind of fun watching the people who really know how to use their cameras (I'm not one of them) set up for those perfect shots:


I think I'm going to call this one Cherry Blossom Paparazzi:


Whenever I'm around the Tidal Basin I like to walk by the Floral Library which is maintained by the National Park Service. It changes quite a bit throughout the year. Right now, there are nearly 100 different varieties of tulips in bloom:


I especially loved these ones:


And these ones:


We were back home in time for breakfast and just before the rain.

Friday, March 23, 2012

SBS - Sylvia's Shooting Star

I thought this block was going to be simple. It looks pretty straightforward, right? The star's rays are paper-pieced and went together easily enough. The corner where the rays all come together is a little bulky with all those pieces coming together there. But the star? It finishes at just 3 inches! I think I need more practice working with very small pieces. I felt like I was all thumbs! 

Friday, March 16, 2012

SBS - Trip Around the World


This block was paper-pieced in rows and then the rows sewn together. It went together in a snap!

Saturday, March 10, 2012

SBS - Love in a Mist

Well, this block was a little frustrating to put together. I won't even go into all the little problems that arose, or the steps that I had to do over. One thing I know for sure - as my frustration level increases, my perfectionism decreases. "Done is better than perfect." Right? I haven't pieced very many eight-point star blocks. I really do love them though. I would love to do a whole quilt with eight-point star variations. They will not be six-inch blocks though, I can tell you that. This block was a little wonky when I finished piecing it. It's amazing what a little steam can do.

Monday, March 5, 2012

Fiesta de Talavera - Block 1


This is Fiesta de Talavera, an applique quilt pattern by J. Michelle Watts. I fell in love with it the second I saw it. It's being offered as a Block of the Month class at Southwest Decoratives in Albuquerque, NM and my friend Liz is teaching it. My friend Olive is taking the class. I wanted to take it too, but it's kind of a long commute from Virginia. So, I decided that I'd follow along as best I can. In class, Liz will be exploring different methods of applique, but I'm just going to stick with my favorite method - back basting. I like to get stitching as quick as possible and don't really like making templates or overlays. Yeah, I'm lazy. Here's my first block:


Sunday, March 4, 2012

SBS BOW - Fool's Puzzle

The block I chose to do this week, Fool's Puzzle, is a Drunkard's Path variation. I generally don't mind sewing curves, when they're large, gentle curves. But, these units finish at 1-1/2 inches and I didn't relish doing 16 of them. So, I decided that I'd try a technique I once saw in a book. I appliqued circles to squares, and cut them into quarters. 


This isn't the final arrangement. I forgot to take that picture, but it looks great, right? Well, look what happened when those units were sewn together.


Not so great. This technique might work for larger circles and squares, but at this size it's very noticeable that the arcs are kind of flat and the circle shape is lost. So I thought. And thought. And thought some more and just before falling asleep a couple of nights ago it came to me. Remarkably I still remembered my "bright idea" the next morning AND it seemed to make sense. I made a template and appliqued the shapes to the squares and cut them into quarters. 


They look a little wonky, don't they? But, here's what they look like sewn together:


I'd say this is a definite improvement. 

(Sorry about the different lighting in the pictures. The completed blocks were scanned whereas the intermediary steps were done with the camera.)

Thursday, March 1, 2012

February UFO Finish

For February, Judy drew #1 and on my list that was an Applique Sampler wallhanging. This was made in a class over 4 months that I took back in 2006 (or was it 2007?) learning hand applique from Piece O' Cake's book, The New Applique Sampler. I loved making this wallhanging, but it was never finished when I didn't know how I'd quilt it. The top was done and I had the batting, backing and even the binding ready to go. I am excited to say that it's now done!